Content

Content:

  1. 1.Step 1: Create Your Account
  2. 2.Step 2: Add Your Website
  3. 3.Step 3: Verify Your Website
  4. 4.Step 4: Account Homepage
  5. 5.Step 5a: Create New Zone
  6. 6.Step 5b: Manage Ad Formats Manually
  7. 7.Step 6: Autotag Behavior/Setup
  8. 8.Step 7: Autotag Installation Instructions
  9. 9.Step 8: Monitor Live Statistics
  10. 10.Step 9a: Request Payment
  11. 11.Step 9b: Fast & Flexible Payment Methods
  12. 12.Step 9c: Stay Active to Earn Loyalty Rewards
  13. 13.Publisher Welcome Gift
  14. 14.Refer New Publishers & Boost Your Earnings by 5%

Stay up to date with our latest news, industry trends and helpful guides!


Adcash Publisher Platform Guide: Monetize Top Traffic in a Few Steps

Ready to monetize your traffic to the fullest? Late last year, the Adcash Publisher platform underwent a thorough makeover. As of 2022, existing publishers have an intuitive UI, a sleeker look and feel to work with, and some enhanced statistics and reporting metrics to rely on. That said, the platform is just as easy to sign up for and use as it ever was before. 

New publishers, this post is just for you. Keep reading as we cover the essentials of getting started as a new Adcash Publisher, from registering your account and adding your website to verifying your domain, placing ads, and earning revenue from onsite conversions.

How to Monetize a Website: 2022

While Pay Per Click Advertising (when done right) is a great way to generate onsite revenue, you can always double down and expand your strategy. Find out how to monetize a website with 2022’s Top Ten Website Monetization Strategies. Check out the full article below.

Why Should I Monetize with Adcash? 

Before registering a new account, it helps to know what the Adcash Publisher platform can bring to the table regarding website monetization capability, ad placement and reporting. 

Website owners, content creators, ad networks, and SSPs of all sizes can effectively boost their onsite revenue in a few simple steps. The Publisher platform uses advanced optimization technology to monetize your traffic and display only the most relevant ads to your users. 

Your new publisher account will automatically unlock the best features, live statistics, and reporting capability, including the below.

Access to Multiple Ad Formats

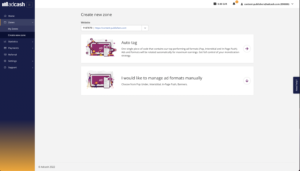
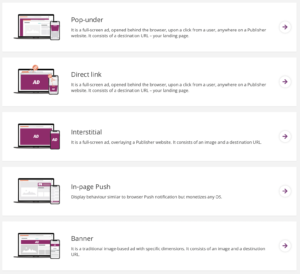
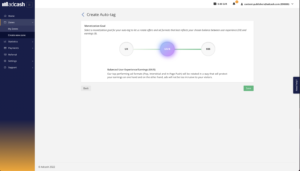
Choose to manage ad formats manually, including pop-under, interstitial, in-page push, and native and banner. Or, streamline your onsite presence with the Autotag, a 3-in-1 ad solution that rotates between pop-under, interstitial, and in-page push. 

Worldwide Coverage 

No matter where your website’s audience is, you’ll be able to monetize your onsite content across all devices and match your traffic with high-quality campaigns across 195 countries. 

Monetize with High Fill Rate & Top Tier Features

You’ll have a wide range of tools and features to make traffic monetization easy. Moreover, you’ll be able to monetize more impressions with consistently high fill rates. 

Anti-Adblock Technology

As a website owner, you’ll be able to show ads even if a user has an existing ad-block tool enabled. Sophisticated Anti-Adblock technology is able to bypass most ad-blockers and increase your earnings in the process.

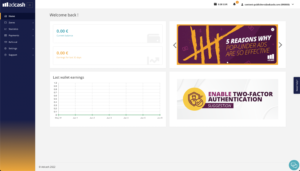
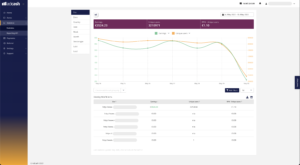
Live Statistics and reporting 

Check out real-time statistics in the Publisher Platform Reports section. You can also track and monetize your earnings in real-time and get statistics sent directly to your server with a built-in reporting API.
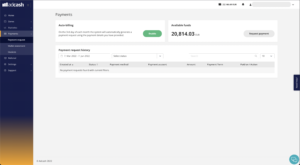
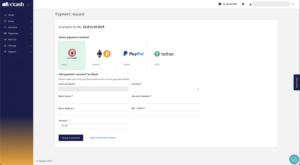
Fast Payments 

You’ll have various fast and flexible payment methods, including Bank Transfers, PayPal, Bitcoin (BTC), Tether (USDT), Skrill, and Capitalist.

Adcash Publisher Platform: Setup Steps

Without further delay, we’ll cover the steps needed to set yourself up as an Adcashh Publisher. We’ll cover each process step below, including how to create your account and add your first website. 

​Check out more Publisher Platform FAQs 📺

If any questions arise while you register your publisher account, you can always reach out to our expert team. We’ll quickly address your queries and show you how to monetize a website to the fullest. 

You can also watch a short video of the most frequently asked Publisher questions here.

Step 1: Create Your Account

Publisher platform account creation

First, you’ll need to register your Adcash Publisher account on the platform. Head over to the account creation tab on the Adcash homepage and fill in a few key details, including your name, email, password, and billing currency. Then click the “Register” button to confirm.

Next, you’ll get an email with an Adcash account activation link. Click the link to verify your email address. You can contact customer support if the email does not arrive within an hour

Enable 2FA

Remember to add an additional layer of security and password protection to your account by enabling 2FA. Find out more about the 2FA account setup

Step 2: Add Your Website

Publisher platform - add your website

Next, you’ll need to add a link to the website through which you’d like to start monetizing traffic. Add the relevant URL, ownership parameters, and the vertical or niche the website falls under in the box provided. Click “Submit.”

Remember that Adcash caters to almost all website traffic in all major languages. They do, however, withhold the right to prohibit certain types of websites. You can find out more about site approval regulations here. 

Once submitted, the compliance team will review your website. After approval, you’ll receive a confirmation email. But before you move into zone creation, you’ll need to verify your website domain, and there are two ways you can do this. 

Step 3: Verify Your Website

Step 3 - Verify your website

After your URL is registered, you’ll need to verify your website domain. You can do this using one of two methods. 

HTML tag – Placing a simple meta tag snippet into the code of the index page. 

HTML file – Uploading a file into your domain root directory. 

Keep in mind that the verification method you side with will largely depend on your web host. You can use the HTML tag method if you cannot upload HTML files to your domain’s web host, and likewise, use the HTML file method if you can upload HTML files to your domain’s web host. 

Please note: If your site uses an SSL/TLS certificate, ensure it includes an HTTP to HTTPS redirect. You can read more about website domain verification here

Step 4: Account Homepage

Step 4 - Account homepage

Welcome to your account homepage! Now that your Adcash Publisher platform account is fully registered, your website added, and your domain approved, all that’s left to do is navigate through the platform, set your zones, and start placing ads on site. 

The Adcash Publisher homepage is easy to work with and navigate around. Head to the zones tab, where you can create new ad units and configure your site placements for the best possible reach. 

Step 5a: Create New Zone

Step 5a - Create New Zone 1

Now it’s time to get your ads to display on site. Open the “Zones” tab on the Publisher Platform homepage. Select “Create New Zone” and find the right ad format to best compliment your traffic. From there, a snippet of Javascript code will be generated that you can insert onto your website. Check out the code integration support pages for more information.

Monetize with Autotag 🦾

Here’s where things start to get interesting. You can either manually select your ad formats and place them onsite one by one or insert three formats simultaneously with a single line of code. 

The Autotag feature is designed to think ahead of the competition. The tag consists of 3 top-converting ad formats: In-Page Push, Pop-Under, and Interstitial. All three ad formats are in one easy-to-integrate tag, where you, as the publisher, take control of your monetization journey, delivering and rotating targeted ads based on your audience’s behavior. 

Step 5b: Monetize Ad Formats Manually

Step 5b - Manage Ad Formats Manually

The second dropdown will direct you to five leading ad formats, each with its unique code snippet that you can copy/paste onto your website. The formats are split according to Full-Screen Ads (Pop-Under and Interstitial) and Display Ads (In-Page Push, Native, and Banners Ads). Below you’ll find a brief description of each. 

Pop-Under – By appearing behind the browser window, these ads seamlessly integrate into the UX flow, staying behind the scenes until the user logs out of what they’re doing.

Interstitials – Appearing while the website/page loads, Interstitials remain highly visible without being too intrusive. The ad also has a hard-coded 5-second countdown window.

In-Page Push – These alert-like ads are the next generation of the traditional push notification. They’re well-targeted, highly engaging, and unobtrusive to a site’s UX.  

Native ads – Blends seamlessly with almost any onsite content, generating high engagement rates and conversion potential along the way. 

Banners – These ads come in various shapes, including skyscrapers, rectangles, and leaderboards. They’re versatile and deliver maximum visibility and engagement. 

Step 6: Autotag Behavior/Setup

Autotag Monetization Goal & Behaviour SetUp

Autotag has a Monetization Goal where you can adjust the frequency and consistency of the ads displayed on-site. As a website owner, you can find the right balance between increased overall earnings and a quality end-user experience.

As a rule, the higher the monetization goal, the more frequently ads will be shown on site. If your traffic is sensitive to overadvertising, you can always lower the goal and increase your user experience (UX). The idea is to find the perfect balance between the two. Below are three different monetization goals.

Maximum Earnings: Where the algorithm adjusts to display more offers more frequently to monetize more traffic and generate maximum earning potential.

Better User Experience: Fewer ads are displayed and less frequently. This will have less revenue potential but give your website visitors a much better user experience. 

Balanced User Experience/Earning Potential: Ads will rotate in such a way as to protect your earnings on one hand while remaining less intrusive to site visitors on the other. 

You can read more about the Autotag feature here

Step 7: Autotag Installation Instructions

Autotag Installation Instructions

Now all that’s left to do is copy the Javascript tag from the Autotag display and insert it into the source code section of your site. Depending on your site and your unique requirements as a site owner, you can either choose to copy the Autotag code with or without the accompanying Anti-Adblock code.

Check out this article for full Autotag installation instructions on WordPress, or browse through the website integration supporting page for further information and tailored steps to monetize more traffic. And remember to ensure you have full admin access to your website. 

Step 8: Monetize & Monitor with Live Statistics

Monitor Live Statistics

Finally, you can monitor live statistics directly from your Adcash Publisher Panel Reporting Tab once you’re fully set up. Here you’ll have the essential metrics to analyze and monetize your website. We suggest using this panel regularly to track your site’s performance and collect valuable insights for future ad placements. 

Moreover, you can filter your reporting according to the metrics below and more. 

  • Zone
  • Country
  • Date
  • Week
  • Month 
  • Device Type

You can learn more about the Publisher Statistics page here

Publisher Reporting API

The Publisher Reporting API will allow you as a publisher to get statistics sent directly to your server without needing to access the publisher panel. You’ll need to generate a token with your username and password to get started. Find out more about Publisher Reporting API

Step 9a: Request Payment

Request Payments

Finally, you’ll need to make a payment request to monetize and withdraw your earnings. Payment requests start at 25 USD/EUR and are processed 30 days after the end of each month on a  NET+30 basis. However, you can reach out to your Publisher Manager and see if you’re eligible for a payment-on-demand solution.

You can also enable Auto-Billing, where on the third day of each month, the system will automatically generate a payment request using the payment details you have provided.

We’ve also implemented a daily payment request system, meaning that your payments are always paid promptly and with a low withdrawal minimum. To take advantage of it, head to Auto-Billing and select Daily.

Please refer to the payment request support page for all the necessary steps.

Step 9b: Fast & Flexible Payment Methods

Payment Methods and Cycle

When it comes time to monetize and collect your revenue, you’ll have various payment methods at your disposal, as well as some publisher-friendly payment terms to make transactions more seamless. Payment methods include bank transfers, PayPal, Bitcoin (BTC), Tether (USDT), Skrill, and Capitalist.

Step 9c: Stay Active to Earn Loyalty Rewards

Finally, as a Publisher, you’ll be automatically enrolled in our Loyalty Program. By simply achieving a daily activity threshold (1/3/5/5 EUR/USD a day for each respective level) with no pauses or breaks, you’ll be able to request your payments faster at no extra charge. For the full rundown, as well as terms and condition, be sure to head to our Loyalty Program page.

Publisher Welcome Gift

To sweeten the deal even further, all new publishers will automatically earn a Welcome Gift upon registering, which allows you to to request a NET+1 payment without any retained amount!

Here’s how to use it:

  1. On your account home page, you’ll see this banner:
  2. Ensure your payment requests are set to manual as this doesn’t apply to auto-billing.
  3. Select NET+1 as the payment term.

Then simply request the payment, and it’ll go through the following day! 🙌

Refer New Publishers & Boost Your Earnings by 5%

Refer other publishers to the Adcash platform and get 5% of their lifetime earnings. It’s super simple to join where you only need an Adcash Publisher account. Share your referral URL, and you’re good to go! 

 All the best on the road ahead, and as always, feel free to reach out to our all-star Publisher team or support center for tailored tips and placement suggestions to help you monetize more traffic.

Join the conversation

1 comment

Profile picture of Adesoji Omosebi

Adesoji Omosebi on Jul 22, 2022 at 2:01 pm

I look forward to your prompt approval of our medium, www.terryanews request we made before your team of experts.

Submit a comment

Your email address will not be published. Required fields are marked *