#4 Zone & Source-Based Campaign Optimization
|
NB: “Source-based optimization” is more granular than “zone-based” since it breaks down third-party SSPs inventory into “sources.” However, you first must master the blended optimization practice of “zone-based” before getting involved with “source-based.”
|
One of the significant benefits of zone-based optimization for CPM bidding is the opportunity to tailor your campaign bid(s) to the respective performance KPIs of every single zone driving impressions to your campaign (yes, not all zones are made equal).
Here is a basic “three-layered strategy” to apply to your CPM campaign optimization and bidding practices. If you’re apprehensive about the cost-benefit of analyzing each zone, don’t fret, we’ve laid it out for you.
| Not-Performing Zone(s) |
Not converting zones.
Stop wasting money on those! |
| Low-Performing Zone(s) |
Converting zones, but ROAS is negative.
Keep buying but adjust your bid to your ROAS! |
| High-Performing Zone(s) |
ROAS is positive.
Get the most out of these by increasing your bid to maximize WinRate! |
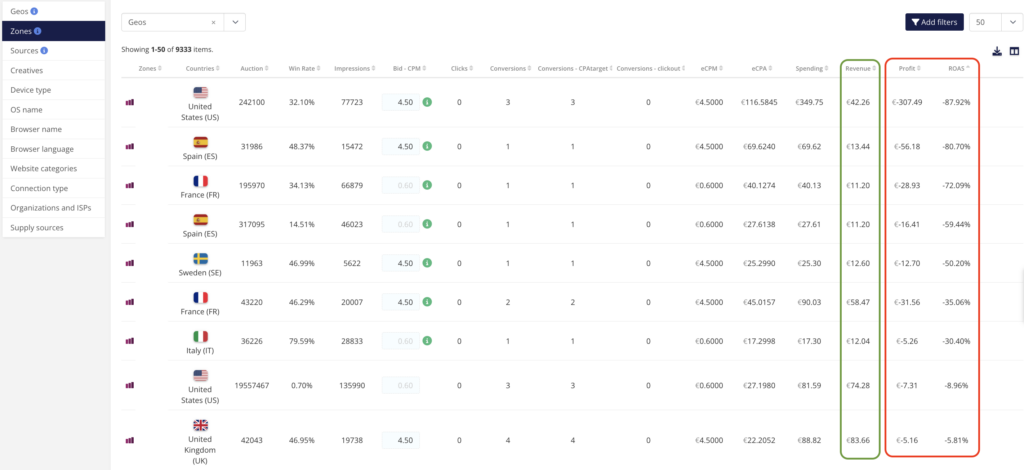
Not-Performing Zone(s)
Your goal as an advertiser is to run, Forest, run to your performance tab and immediately blacklist these zones that drain your budget and aren’t generating revenue for you.
Addressing zones with zero (0) conversions to “paid events” (i.e., sales) and “high spending” is relatively straightforward. You first should define a clear threshold that helps you separate “high spending” from “low spending” zones. For example, let’s say an advertiser is paid 100€ per conversion/sale on an offer. A more conservative advertiser would consider a zone with “high spending” (a zone that has spent two (2) times the amount the advertiser is getting per conversion/sale). Meanwhile, an aggressive advertiser may pay three (3) times the amount received per conversion/sale in a given area before it is considered a high-spending zone.
⇒ Our advice? Use the blacklisting feature to block these zones from your campaign.
|
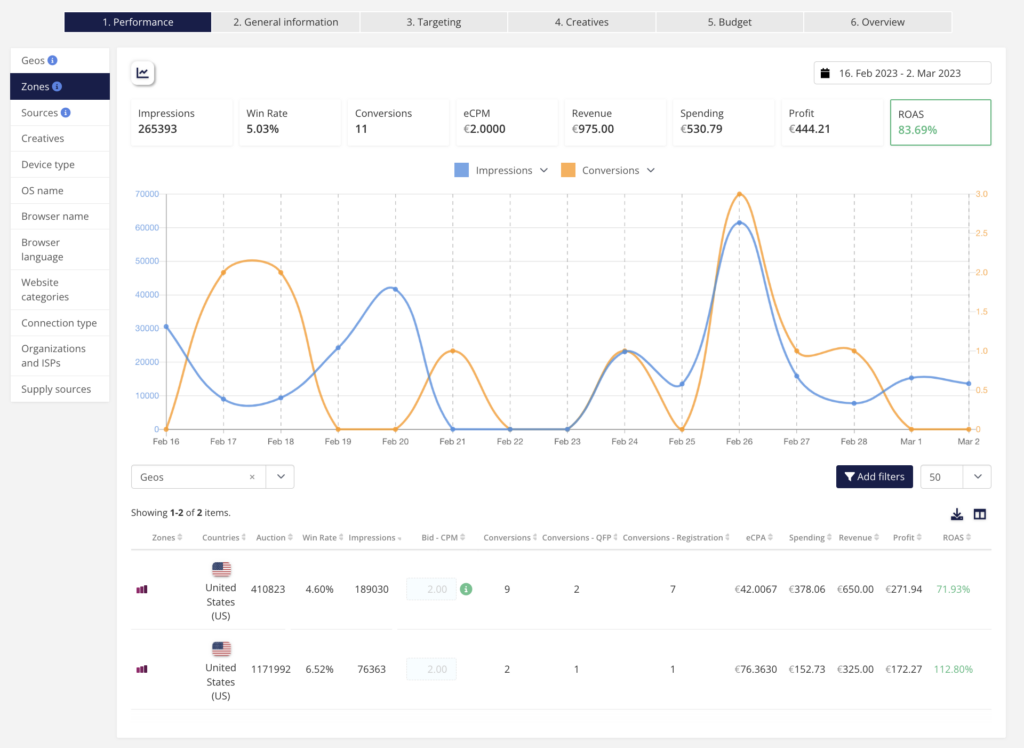
NB: To access the blacklisting feature, remove “Geos” from the secondary dimension selection. Then, on the right side, next to the ROAS column, click the cogwheel to open the menu with blacklist zones.
|

On the other hand, zones with zero (0) conversions/revenue generated but low “spending” should not be adjusted yet. We recommend continuing until you reach your zone with a high-spending threshold.
High-Performing Zone(s)
Your goal as an advertiser is to ensure that your bids are high enough on such highly-performing zones so that your campaign can compete against other advertisers that are eventually trying to win most of the auctions coming from the very same zones.
Any ROAS-positive zone with a low “Win Rate” (anything below 25%) is a zone you are not capitalizing on, as shown below, circled in red. Increasing your bid amount can, in turn, improve your campaign’s “Win Rate.” A higher “Win Rate” translates into more impressions being bought, more conversions, and more revenue, ultimately generating a higher profit.
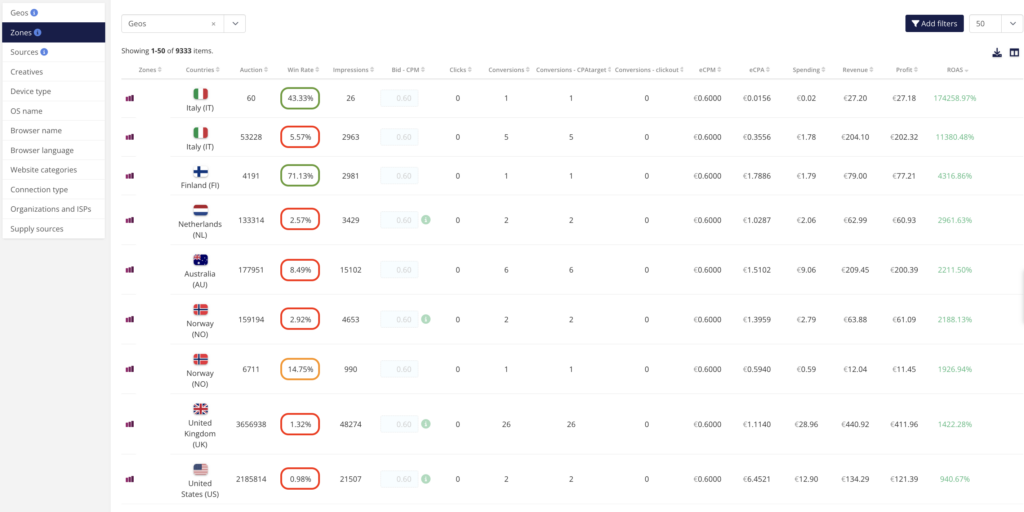
⇒ Our advice? Use the custom bid feature to increase your bid.
Your campaign reaches strong-performing levels as your win rate climbs higher than 25%. There’s less room for buying more, but it may still be worth a bid increase, mainly if your ROAS reflects high profitability.
Low-Performing Zone(s)
Your goal as an advertiser is to adjust your zone-level bid based on your campaign ROAS or eCPA so that you can continue purchasing impressions from these zones that experience conversions.
A low-performing zone does not necessarily mean that overall it is low value or similar to not-performing zones (they are not the same). We consider a zone “low-performing” when a zone is converting (i.e., generating revenue) for an advertiser while the cost of buying impressions from this zone is higher than the revenue it generates. Use the ROAS metric to indicate how much reduction the bid should experience.
⇒ Our advice? Use the custom bid feature to decrease your bid.


Join the conversation
0 comments
Submit a comment
Your email address will not be published. Required fields are marked *